So now you’ve got your wonderful course, how are you going to sell it? An effective sales funnel is designed to present your offer in a compelling way. It connects people with your solution to their problem, establishes a pressure deadline, and gets them to pay. In this post we will look at how you can design a sales funnel using the platform, Systeme.io.

If you haven’t yet created your course, and also want an overview of Systeme.io, go and read this post first.
Watch the video below:
Understanding Sales Funnels
A sales funnel is basically a journey that a customer goes through on the way to their purchase. They might start off getting something from you for free via your opt in form, and then get presented with an offer, and even multiple offers after that.


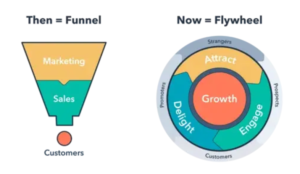
A funnel is important for you to make sales, but it’s important to realise that it’s only part of the sales process. People often only buy from those that they know, like and trust. So, getting their email and sending them a nurture sequence as well as regular newsletters will create a relationship where they are more likely to use that funnel. Hubspot talks about a “flywheel” instead of a sales funnel, where you attract strangers, delight customers who then engage more prospects.
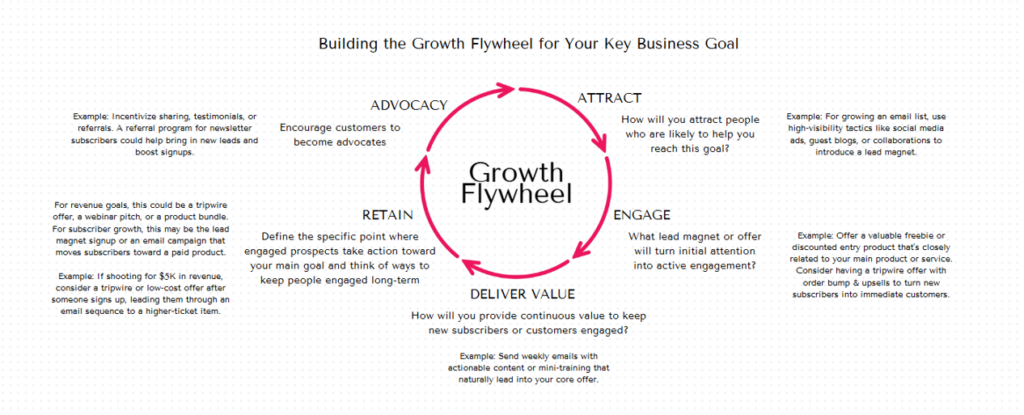
I attended a workshop run by Destini Copp who is a firm believer in flywheels but hers work in these stages:
- Attract: e.g. social media, collaborations
- Engage: with a free offer or low cost offer – this is where your normal funnel comes in.
- Deliver Value: newsletter, webinars, trainings
- Retain: Something that keeps them interested but leads them towards your product e.g. email campaign.
- Advocacy: Turn customers into affiliates.
In her own words:
The difference is dramatic:
Funnel approach = One-and-done sales, always starting from scratch
Growth flywheel = Compound growth, where each success feeds into the next

Nevertheless, at some point, they have to buy, and this is where the sales funnel comes in.
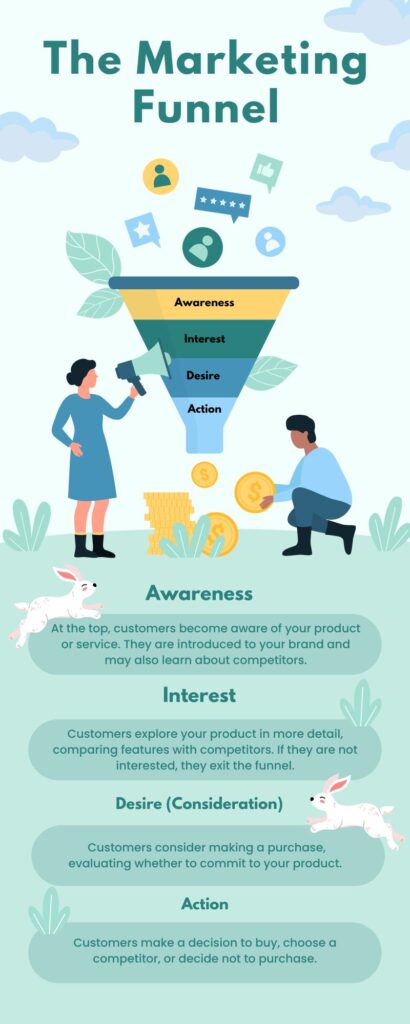
There’s all sorts of sales techniques out there but here’s one example: AIDA: Attention (generate awareness of your product), Interest (increase their interest with more info), Desire (they move from “I like it” to “I want it.” Action (they purchase your product).
Then you can also use different frameworks like using an External obstacle (My kids have a million things on the go and it feels like we are never home) Internal Desire (Just wanting some quiet, present moments) Outcome: (The key to being present and not worrying about chores is a killer mom planner, or dealing with that overwhelm with a workshop of skills.)
Benefits of Using Systeme.io for Sales Funnels
- User-friendly interface – it’s super easy to use.
- Integrated tools and features – you get everything in one spot. Email marketing, create courses and funnels.
- Cost-effectiveness – comparing similar offerings, Systeme.io is definitely the cheapest. And you can do a lot on their free plan as well.
- Automation capabilities – they include a deadline funnel in their system, which is a huge bonus. You can also set triggers, tags and emails to go off.
- Go back and read the previous post on more on my opinion about the pros and cons of this platform.
Step-by-Step Guide to Setting Up a Sales Funnel with Systeme.io
Designing the Funnel Framework
- Identifying target audience: Have a good idea who you will be helping and what their pain points are, because that is what you’ll be working into your sales page.
- Establishing funnel goals: Are you trying to grow your list? Make sales? Create an event? All of these questions will determine what kind of funnel you are making. This post is about making the sales, and we’ll leave the opt in form part of it for another post.
- Mapping out the funnel stages: Have an idea of what you want to do and how. Do you just want to sell one course? Or would you also like to add a bump offer/ upsell/ downsell? Would you like to set a deadline before the price goes up at a certain date or hour? All of this is going to determine how many steps you will need.
Building Your Sales Funnel
Choose the type of funnel you want (first popup form):
Start by clicking on “Funnels” on the dashboard. Then “Create” and more options will pop up. Give your funnel a name (just for you to know what it is).
Select your domain for the funnel. As I’ve said before, it’s crucial to have your own domain name if you want to put it on Instagram or Facebook at all. If you’re just starting out, use the free “systeme.io” one, you can always change it later.
Next, choose the goal of your funnel. This isn’t crucial, as you can always edit it later, but it will help. You can go straight to the sale, or have your home page focus on gathering leads. You could always have a pop up to gather leads on your sales page, though.
At the bottom of this pop up menu, you’ll see the options for choosing a currency. Once you’ve set up your payment gateways, you’ll be able to use these options.
Once you’ve clicked “save,” you’ll go through to the funnel.
Funnel steps
If you’ve selected a funnel just to gather email addresses, you’ll get a squeeze page and a thank you page.
If you’ve selected a sales funnel, you’ll get an order form and a thank you page. Add another page / step to this: a sales page. You can also add an upsell and a downsell.
Here you can click on the pages on the left and also select templates for them, which you can edit.
For each funnel step you get a name and a link. It’s important to edit these as you don’t want people to see “Squeeze page,” so come up with a better name for your page. There’s a useful little clip on the url so you can copy the page link.
Settings of the funnel
On the right you’ll see the options to view the page on that link, edit or change template. Just know that if you change the template, you’ll lose everything that you have made, so if you go that route just copy the information somewhere.
On the right of each funnel step you can choose to duplicate it, move it to another funnel or delete it. Duplicating steps is super useful for order forms at different price points, if you’re using the deadline timer.
At the top you’ll see the Funnel Settings cog, where you set the things in the beginning. From here you can also create a Marketplace offer. This is super useful for referrals.
Editing the funnel page: overview
The pages are created in sections (a big group in a frame), rows (boxes where you’ll put stuff in) and elements (text, image, video etc.). It’s pretty simple to upload or use what you already have on the system. You can even do a carousel of different elements of both image and videos.
Start with a section, use your columns, and then add your elements.
Elements of a page
There is a menu element where you can direct people to your home page, about page and contact page. I use this to direct people to my blog.
Countdown timer
A vital element you’ll need to add is the countdown timer.
You can choose three options:
- Fixed time and day e.g. your Black Friday special will end on a certain day.
- Delay – the offer expires in a certain amount of days or hours (useful to co-ordinate this with your welcome and sales sequence)
- Daily: If someone lands on your page, they have a limited time to get the offer.
- Same as deadline funnel settings.
After you’ve chosen one of these, you need to redirect them to another URL (under “Action when countdown expires”). So, this is where it’s useful to duplicate that order form, and you’ll have one for the special offer and one for when the countdown expires.
Other elements for your page
You can also add raw HTML code (I used this for Facebook comments code) and FAQs. FAQs really help you with SEO, bearing in mind that people are searching for things in question form. So I would recommend text, but you can also add video answers using their FAQs.
You can also use Blocks to save sections and use them again on other pages. If you save it as a master block, if you change it on one page, it reflects on all the pages. Systeme.io also has some premade blocks for you to use e.g. opt in forms, price plans, features and testimonials.
Settings of the funnel page
Under the settings of each page, you can choose the fonts and colours, as well as the language. This will also be used for error messages or email messages. You can also add a background image or colour and you will be able to blur it.
Very important: under SEO, you can add the title of your page and a description. This is really going to help you when Google crawls your page. It’s like the meta description in WordPress. You can also select the social image, which would be like the “featured image” in WordPress, the image that would show up if you share it on Facebook. You can also choose to hide or show your page to search engines. You can also add your Google Analytics code here as well. You can also check your stats on the “stats” section of the funnel, though, and that will also show you your conversion rates.
Make sure that the button on your sales pages takes visitors to the order form. You can link this to “next funnel step” or the specific url of that funnel.
Funnels Tab
A/B testing: You can create two different versions of your sales page and test which one performs better. In these tabs you can also find your stats, sales, leads and deadline settings if you prefer to set them there.
Order form step configuration
You can also set the affiliate commission on this page and sales limits e.g. for if you are selling physical products, or you only want a limited number of people on your course.
You can choose to have a digital product or a physical product.
In this case, we are selling our course, so under “Resources” we select our course in the drop down menu. You can also choose to grant full access or drip the content over time. You can also give partial access, where you are just selling one part of the course, and you can select that part. An expiry date or a future start date can also be created.
Once your payment gateway is all connected up, you can create a price plan by clicking on the plus sign next to “Price plans.” There will be an option to create a new one. Create a name for it and also a name that will displayed on the order form. The statement description is what they will see on their bank statements. The last step is to select how you want to do the payment: once off or in installments, or as a subscription. For the subscription you can also specify a trial period, where they will get it for free e.g. 15 days.
You can also link a coupon to your funnel. Create the coupon under the products tab in the main menu first. The make sure that you drag and drop the coupon element onto your order from.
How to create a landing page: Best practices for design and content
Creating a good landing page is probably a process of trial and error, A/B split testing and seeing what works best.
Here are some tips:
- Attention getting title
- Tagline: your promise
- Button should be a stand out contrasting colour like red or luminous green
- Choose one consistent call to action, repeatedly
- Have the first button above the fold
- Use images and video
- Keep it simple: write for a 12 year old. (Scannable for today’s people – they have a short attention span)
- Bullet points of how this product will help you: use people’s pain points and research what they are looking for on Google
- Present your solution with a question heading: “Would you like?
- Promise: how this will help
- Scarcity: have the timer going
- Call to action: have buttons throughout the page.
- Social proof /testimonials – use their name and location.
- Introduce yourself with a nice picture and share something about you and your journey.
- Multiple points of interaction: put your social links and other contact details on the footer.
Enhancing Funnel Performance
- Integrating payment gateways: For South Africans I recommend linking up with Paystack and then choosing rands. If you are in a country that accepts Stripe, go for the dollars. You can also do Paypal in dollars, but remember that not everyone has Paypal. (To set up payment gateways, to to Settings. For a fuller explanation of how to set it up, check out this workshop). (Please don’t do Flutterwave, though! See previous post for the story on that, on the video).
- Setting up upsells and downsells: You can set up your funnel steps in this order: Sales Page, Order Form, Upsell (a more expensive offer), Downsell (a cheaper one if they don’t take the upsell) and Thank you Page. You can also add an order bump on the order form (about 20% of your main offer)
How to do an order bump:
On the order page step configuration, scroll all the way down to the bottom, where it says “order bump.” Once you’ve clicked on it, you can select your product from the resources, and create a price plan for it. Then edit your order page – drag and drop the order bump icon from under the payment section. You’ll need to edit the details. An order bump is something they might want if they are already buying your offer.
Upsell page:
The interesting thing about this one, is that it doesn’t work on its own. You must have purchased the main product and then you will get directed there. There’s no order form, just two buttons: one accept the offer (goes to thank you page), and the other to reject it (goes to Downsell page). This is because you don’t want them to have to fill in a whole form again, if they’re already in purchase mode.
Downsell:
If they decline this offer, they get directed to the downsell page. Again, it’s just a yes or a no, and they will then get directed to the thank you page.
You can add as many upsells and downsells as you like.
Analysing funnel performance
The key metrics to track are your pageviews, opt ins, and sales. You can do that under Stats in the funnel.
Optimising for Better Results
- A/B testing strategies – try different sales pages and see how they perform. All you need to do is create another funnel step and add it to the A/B split testing to see which one does better.
- Optimising content for conversions: Always go back to the user experience and see what another person says. I had some feedback on my sales page and I made the video smaller and put the opt in button above the fold. I also had to focus on just one message i.e. just blogging rather than blogging and a website.
- Using customer feedback for improvement. Get people to give you feedback on the course you have created. Create a survey form in Google forms or use Survey Monkey.
Troubleshooting and Support
- TEST! Test your funnel and see what it is like from a user experience. Make a price plan for one rand / dollar and see if it works.
- Accessing Systeme.io support resources. These guys are very helpful, even on the free plan, and that’s impressive. You just need to email them.
FAQs
1. What is the cost of using Systeme.io?
Systeme.io offers several pricing plans, including a free plan and paid tiers. The free plan includes essential features such as email marketing, sales funnels, and automation, but with limited capacity. The paid plans start at around $27/month and go up to $97/month, with each plan offering additional features such as more contacts, unlimited sales funnels, and advanced automation tools.
2. Can I integrate third-party tools with Systeme.io?
Yes, Systeme.io supports the integration of various third-party tools. You can connect external apps using Zapier, which enables you to automate workflows and integrate apps such as payment gateways, email marketing services, CRMs, and more. Additionally, Systeme.io offers native integrations with platforms like Stripe and PayPal for payment processing. For South Africans, you can use Paystack for rands.
3. How do I track and analyze funnel performance?
Systeme.io provides built-in analytics to help you track and measure the performance of your sales funnels. You can view metrics such as the number of visitors, conversions, opt-ins, and revenue generated. The platform also allows you to split test different funnel variations and assess the performance of each version to optimize your marketing strategies.
4. Is there a limit to the number of funnels I can create?
The number of funnels you can create depends on your subscription plan. On the free plan, you’re limited to creating 3 funnels, while paid plans allow for unlimited funnels. If you need to scale up, upgrading to a higher-tier plan will remove these limitations.
Conclusion
You might have often participated in a funnel on the internet as you opted into someone else’s form and got presented with an offer (or more). Now’s your chance to have your turn and create your own funnel to better present your course or products. I’d like to know what other people have tried and what your success has been.


[…] Sell your course with a sales funnel […]